

Open Publish in your dashboard and you get a blank page and a cursor. Start writing.
The controls come to you as you need them, and two things get you to all of them:
- Press
/at the start of a line to add a photo, a gallery, a table, a map, a video — anything that is not a paragraph. - Select some words and a small bar appears with headings, bold, links and AI.
That is the whole editor. The rest of this article is what is behind those two.
Adding something to a post
Start a new line and press /. A list appears; keep typing to narrow it down.
/gal gets you the photo gallery, /tab a table, /map a map.
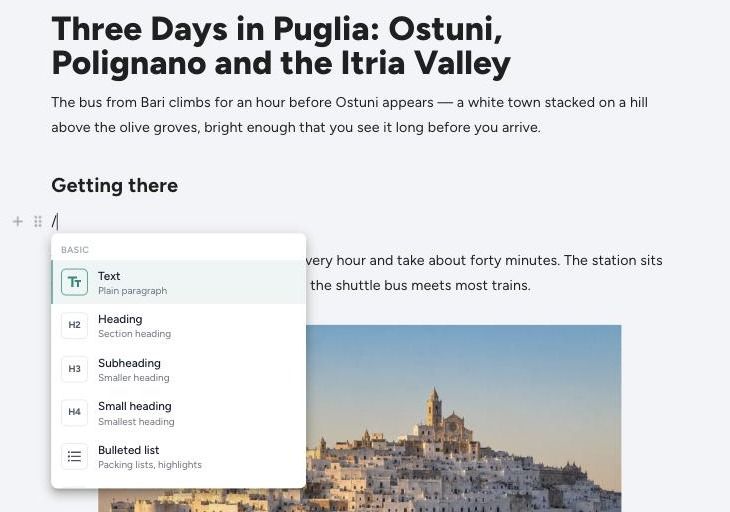
You can also use the + in the left margin. It follows your cursor, and it appears next to whatever block you hover over — so you can drop a photo into the middle of a finished post without scrolling to the end for the menu.
The list is grouped, and it is always in this order: the everyday text blocks first, then Media, Structure and Travel underneath.
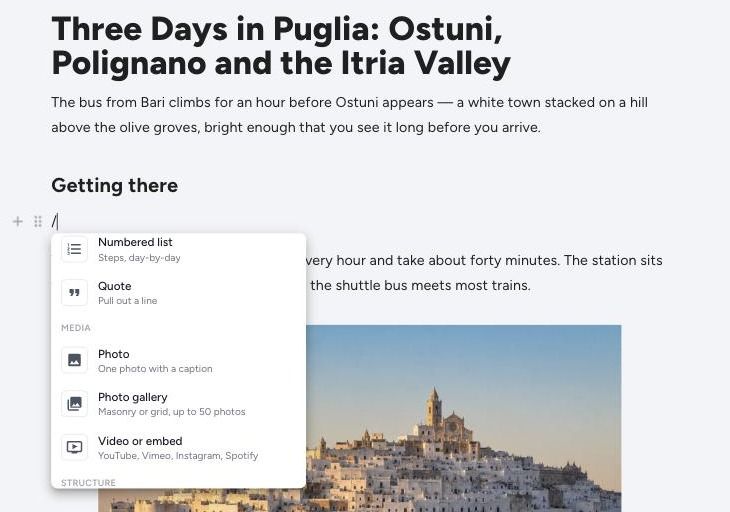
Here is everything in that list:
| Photo | One picture, with a caption and a description |
| Photo gallery | Up to 50 pictures, as masonry or a carousel |
| Video or embed | YouTube, Vimeo, Instagram, Spotify |
| Table | Prices, opening times, day-by-day plans |
| Table of contents | Builds itself from your headings |
| Button | A call to action a reader can tap |
| Collapsible section | Detail folded away behind a summary line |
| Divider | A break between two sections |
| HTML | An escape hatch for an embed we do not support yet |
| Map | The route you actually travelled, drawn from your post |
| Post card | One of your other posts, with its cover photo |
Headings, lists and quotes are in the same menu, but you will usually reach those faster by selecting the text you already wrote and changing what it is.
Adding photos without the menu
You do not have to go through / at all. Drag a photo out of Finder — or
your file manager — and drop it on the paragraph it belongs under. It lands
where you dropped it, not where the cursor happened to be, and you can keep
typing while it uploads.
Pasting works too: copy a picture anywhere, put the cursor where you want it and press paste.
Formatting text
Select any words and the bar appears.

Left to right: AI, then what this block is — Text, Heading, Subheading, Small heading, Quote, a bulleted or numbered list — then bold, italic, strikethrough, link and alignment.
That block dropdown is the quickest way to turn a paragraph into a heading, or four lines into a bulleted list: select them and pick.
Links
Select the words, click the link button, paste the address, press Enter. To change or remove a link later, click inside it and open the same button.
On your own hosted blog — and only there — the link panel also lets you
mark what kind of link it is: dofollow, nofollow, sponsored for anything
you earn from, or ugc. See link
relationships.
Moving things around
Every block has a ⠿ handle in the left margin. It belongs to whichever block your cursor is in, or whichever one you are hovering over.
- Drag it to move that block somewhere else.
- Click it for Ask AI, move up, move down, duplicate and delete.
AI that does not make things up
Select a paragraph and press AI, or press ⌘J (Ctrl+J on Windows)
anywhere and it works on the block you are in.
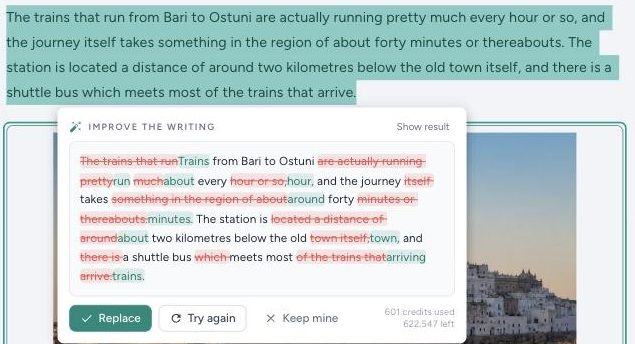
It can tighten your writing, fix spelling and grammar, shorten a paragraph, turn your notes into prose, or carry on from where you stopped. What it will never do is invent a price, an opening time or a bus number you did not write yourself.
Nothing changes until you accept it: the suggestion is shown as a difference against what you wrote, word by word, so you can see exactly what it wants to change before you agree to it.
The full list, and what it costs, is in AI in the editor.
SEO while you write
Open SEO in the sidebar and you get a real Google preview and a running list of what is still worth fixing — updating as you type, with no "analyse" button to remember to press. See SEO while you write.
Your photos and your privacy
Photos from a phone or a camera usually carry the exact coordinates of where they were taken, along with the camera and the timestamp. Your camera roll has your home address in it about as often as it has a piazza.
We strip all of that from every photo you upload, automatically, before it is stored. It does not change how the photo looks.
Saving
Your draft saves itself every twenty seconds, and again whenever you publish or preview. The word count sits in the bottom right; the hint next to it is replaced by upload progress while a photo is going up.
You can close the tab mid-sentence and come back to it. Drafts live under Drafts in the dashboard.
Writing in HTML instead
The switch at the bottom right — Switch to HTML+Markdown editor — hands you your post's raw markup in a plain text box, with a live preview beside it on a wide screen. Nothing is converted in either direction: the editor stores your writing as HTML, so the switch hands you the same document in different clothes and switching back hands it straight to the visual editor again.
Use it for a long chunk of markup, or something fiddly you would rather fix by
hand. For a single embed you do not need it — the / menu has an HTML
block.
Coming back, we check that everything you wrote can be rebuilt exactly. If some hand-written markup cannot be, you stay in the HTML editor and we tell you what would have been lost, rather than quietly rewriting your post.
Posts that open in the HTML editor
Imports from Hive, and posts whose body was written as raw HTML somewhere else, open in the HTML editor whatever you have set. You edit the markup as it is stored, and it publishes exactly as your readers already see it.